
Note: For businesses incorporated in Hong Kong, you can only pay out submitted bills from your Aspire USD Account.
Supported bill/invoice file types
When forwarding bills to your designated email ID or uploading it in your Aspire app, please note that only certain file formats are supported: JPG, JPE, JPEG, PNG, GIF, and PDF files.
Required invoice information for submitting Bills
For an optimal experience, please remember our guidelines as mentioned below:
The bill/invoice you'll submit for Bills should be addressed to your company
The bill/invoice should show all payment details like bank name, account holder name, account number, and invoice amount
The bill/invoice should show the supplier’s email so we can send a notification to the supplier once the payment has been approved;
The bill/invoice may be in any currency.
How to submit bills
Admin, Finance, and Employee users can submit Bills to Aspire in two ways:
Via Aspire app
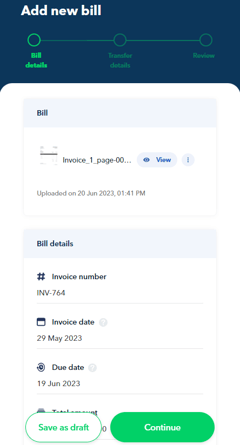
1. On your Aspire dashboard, click on "Bills" in the left navigation bar (web app) or click "Menu" and choose "Bills" (mobile app).

2. Click on ➕ New Bill and upload your bill/invoice for payment
3. Choose Yes, Autofill to automatically fill in Bill details, or No, Enter Manually to input them yourself.

4. If you select Yes, Autofill, the scanning process will automatically fill in the Bill details, Reporting, and Supported documents fields within 30 seconds.
5. Click "Continue" if all is good (or "Save as draft" to access later from your Bills dashboard)
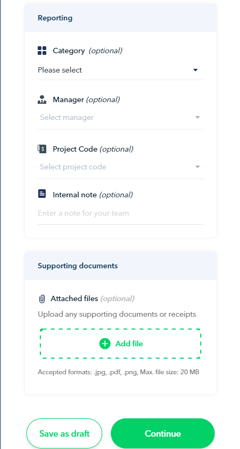
Notes: It is optional to fill up the Reporting and Supported documents fields when submitting a bill.
6. Fill in the optional transfer details, such as the recipient and payment details. Once done, click "Continue"

Note: During this stage, selecting a recipient is optional for all users. However, only Admin, Finance Users and Budget Owners with transfer rights can create new recipients.
7. If all details are good, click on "Submit bill".

Before making the payment for your bill, it will go through a review and approval process by either Admin, Finance Users, or Budget Owners (if the bill is tied to a budget).
This ensures that all necessary information is accurate and complete before payment.
Via email
Forwarding bills to Aspire through your designated email ID. Make sure to check the supported file types (JPG, JPE, JPEG, PNG, GIF, or PDF) before submitting your bills to ensure a smooth processing experience:
Note: When sending bills via email, please ensure that the designated email ID is placed in the "To" section. If the email ID is placed in the CC or BCC fields, the bills will not be received properly.
You can ask your vendors to send their invoices to your dedicated email ID, ensuring a smooth processing of bills on your Aspire account.
Learn what happens when you forward bills/invoices to your unique email ID by following the guide below:
1. Copy your unique email ID by going to "Bills" on your Aspire app dashboard

Note: If you cannot see your unique email address, click on "New Bill" and submit a Bill. A unique email address will be assigned to you after your first Bill submission.
2. Once the forwarded email containing invoices is processed, the OCR technology will automatically fill in the necessary details and create a draft entry on the Bills Dashboard:
This icon
 will appear next to the drafted bill if it was sent by one of the users of your Aspire account:
This icon
 will appear next to the drafted bill if it was sent by any other person outside of your Aspire account:
3. Admin, finance user, or Budget Owners can review and submit the bills by clicking the draft bills from the list.
A pop-up window would slide from the right part of the page where you can see the attached bills, the content of the email, and amend the Bill and Transfer details.

If there are multiple files attached to the email, you can add the other files as supporting documents to the bill submission:


4. Once the Bill is reviewed and submitted, users can approve the submitted bills to initiate the transfer to the said bills
Scheduling Bill Payment
Supported Debit Accounts & Transfers
You can schedule bill payments in the Aspire app for local transfers from the following debit accounts:
SGD Account: SGD to SGD transfers.
IDR Account: IDR to IDR transfers.
Scheduled payments are currently not available for Aspire USD, EUR, or GBP account.
How to Schedule a Bill Payment
In-App Scheduling (SGD Account Only): Admin or Finance users with transfer rights can schedule bill payments after the bill payment request has been approved.

Alternative for USD, EUR, or GBP Accounts:
Save the bill as a draft and process it later.
We are actively working to expand scheduled payment support to additional currencies.
Notifying the recipient of the bill payment
Bills submitted in-app
When placing the payment details, make sure to tick the "Notify recipient" option under the transfer information section
Place the email address of the transfer recipient so that once the bill is paid, we will notify them on our end

Questions? Chat with us by clicking on the messenger icon at the bottom right of the screen once you are logged in.